Article
工厂模式详解
在软件设计中,工厂模式(Factory Pattern)是一种创建对象的设计模式。它的主要思想是定义一个接口或基类,通过该接口或基类让子类决定实例化哪一个具体类。工厂方法使得实例化过程延迟到子类。本文将介绍工厂模式、抽象工厂模式,并探讨它们在前端开发中的应用场景和一些典型案例。
工厂模式
为什么需要工厂模式?
假设你正在开发一个应用,这个应用需要创建不同类型的动物对象。最初你可能会简单地用构造函数来创建这些对象。然而当类型和逻辑复杂起来时,代码就会变得难以维护。工厂模式可以帮助你将对象创建的过程封装起来,从而保持代码的清晰和可扩展性。
工厂模式基本结构
工厂模式通常包含以下部分:
- 产品接口或抽象类(Product Interface/Abstract Class):定义了具体产品需要实现的方法。
- 具体产品类(Concrete Product Classes):实现了产品接口或抽象类。
- 工厂接口或抽象类(Factory Interface/Abstract Class):定义了创建产品的方法。
- 具体工厂类(Concrete Factory Classes):实现了工厂接口或抽象类,用于创建具体的产品。
示例
定义产品接口
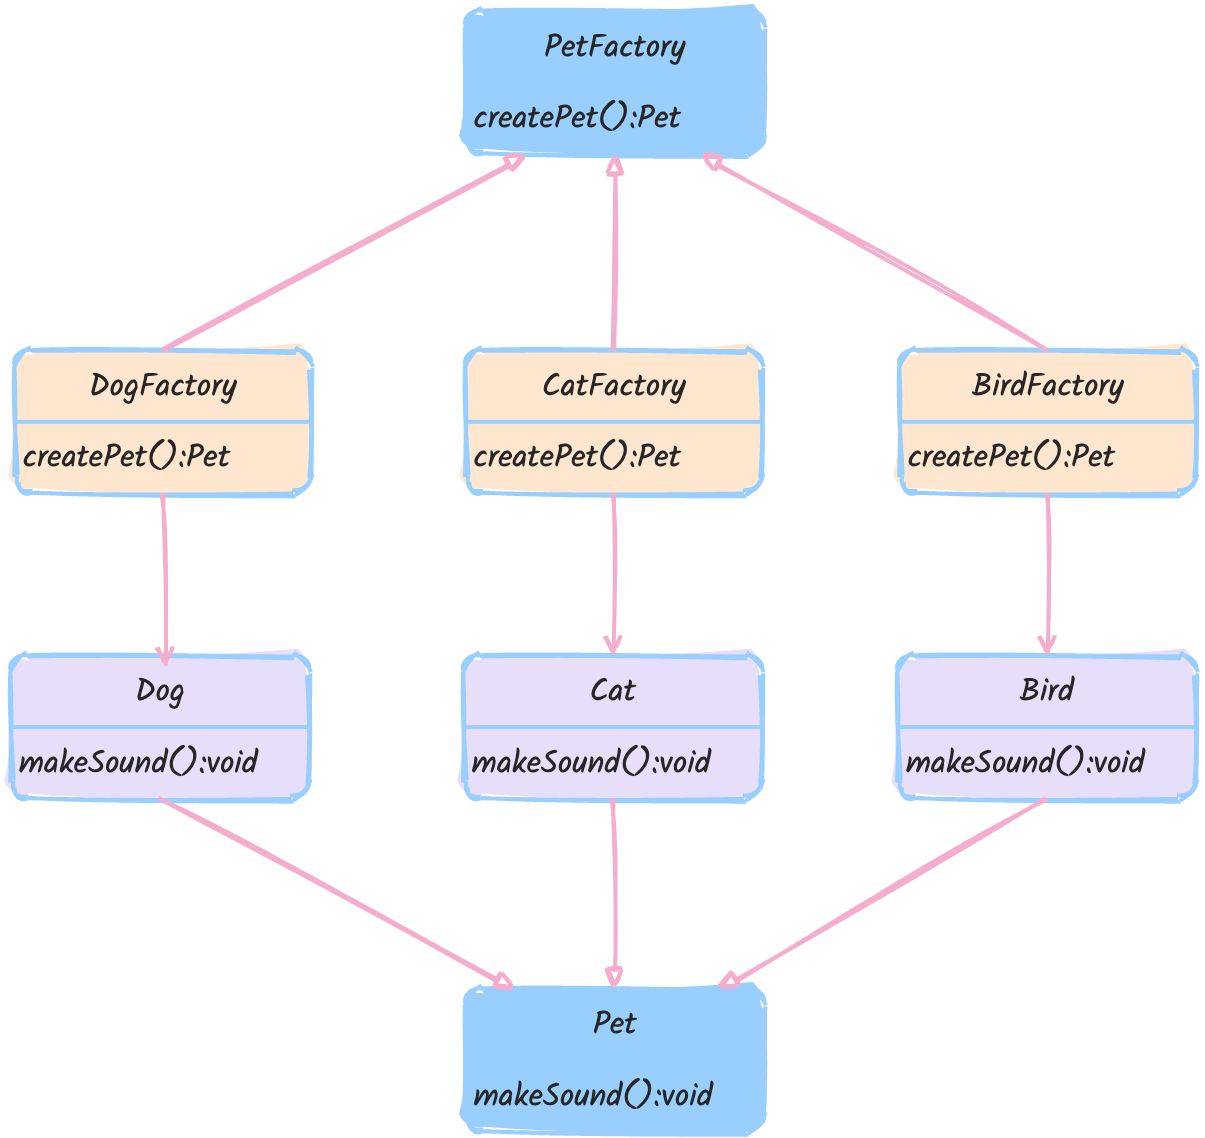
首先,我们定义一个代表宠物的接口。
interface Pet {
  makeSound(): void;
}
创建具体的产品类
接下来,我们实现具体的宠物类,每个类实现了 Pet 接口。
class Dog implements Pet {
  makeSound(): void {
    console.log("Woof! Woof!");
  }
}

class Cat implements Pet {
  makeSound(): void {
    console.log("Meow! Meow!");
  }
}

class Bird implements Pet {
  makeSound(): void {
    console.log("Chirp! Chirp!");
  }
}
定义工厂接口
现在我们定义一个工厂接口,用于创建宠物。
interface PetFactory {
  createPet(): Pet;
}
实现具体的工厂类
我们创建具体的工厂类,每个工厂类创建一种具体的宠物。
class DogFactory implements PetFactory {
  createPet(): Pet {
    return new Dog();
  }
}

class CatFactory implements PetFactory {
  createPet(): Pet {
    return new Cat();
  }
}

class BirdFactory implements PetFactory {
  createPet(): Pet {
    return new Bird();
  }
}
使用工厂创建宠物
最后,我们通过工厂来创建具体的宠物对象,而不需要直接实例化具体的宠物类。
function petStore(factory: PetFactory): void {
  const pet = factory.createPet();
  pet.makeSound();
}

const dogFactory = new DogFactory();
const catFactory = new CatFactory();
const birdFactory = new BirdFactory();

petStore(dogFactory);  // 输出: Woof! Woof!
petStore(catFactory);  // 输出: Meow! Meow!
petStore(birdFactory);  // 输出: Chirp! Chirp!
通过这种方式,我们能够解耦宠物创建的细节,使得代码更具弹性和可扩展性。当需要添加新的宠物类型时,只需添加对应的宠物类和工厂类即可,而不需要修改现有的代码。
工厂模式的优缺点
优点
- 解耦创建和使用:工厂模式将对象的创建过程与使用过程分开,使代码更加清晰和易于维护。
- 可扩展性强:添加新产品类型时只需添加新产品类和工厂类,不需要修改现有代码。
- 单一职责原则:工厂模式遵循单一职责原则,每个工厂类专注于创建一个具体产品。
缺点
- 增加代码复杂度:引入工厂模式将增加额外的类和接口,使代码复杂度增加。
- 过度设计风险:在简单项目中使用工厂模式可能被认为是过度设计。
抽象工厂模式
抽象工厂模式(Abstract Factory Pattern)提供一个接口,用于创建一系列相关或依赖的对象,而无需指定它们具体的类。工厂的每一个具体子类生成一个相似的产品。抽象工厂模式用于创建多个相关联的对象系列,使得一系列对象的创建过程统一化。
实现方式
假设我们要创建一系列的 UI 元素,比如按钮和文本框,且这些 UI 元素有不同的风格。
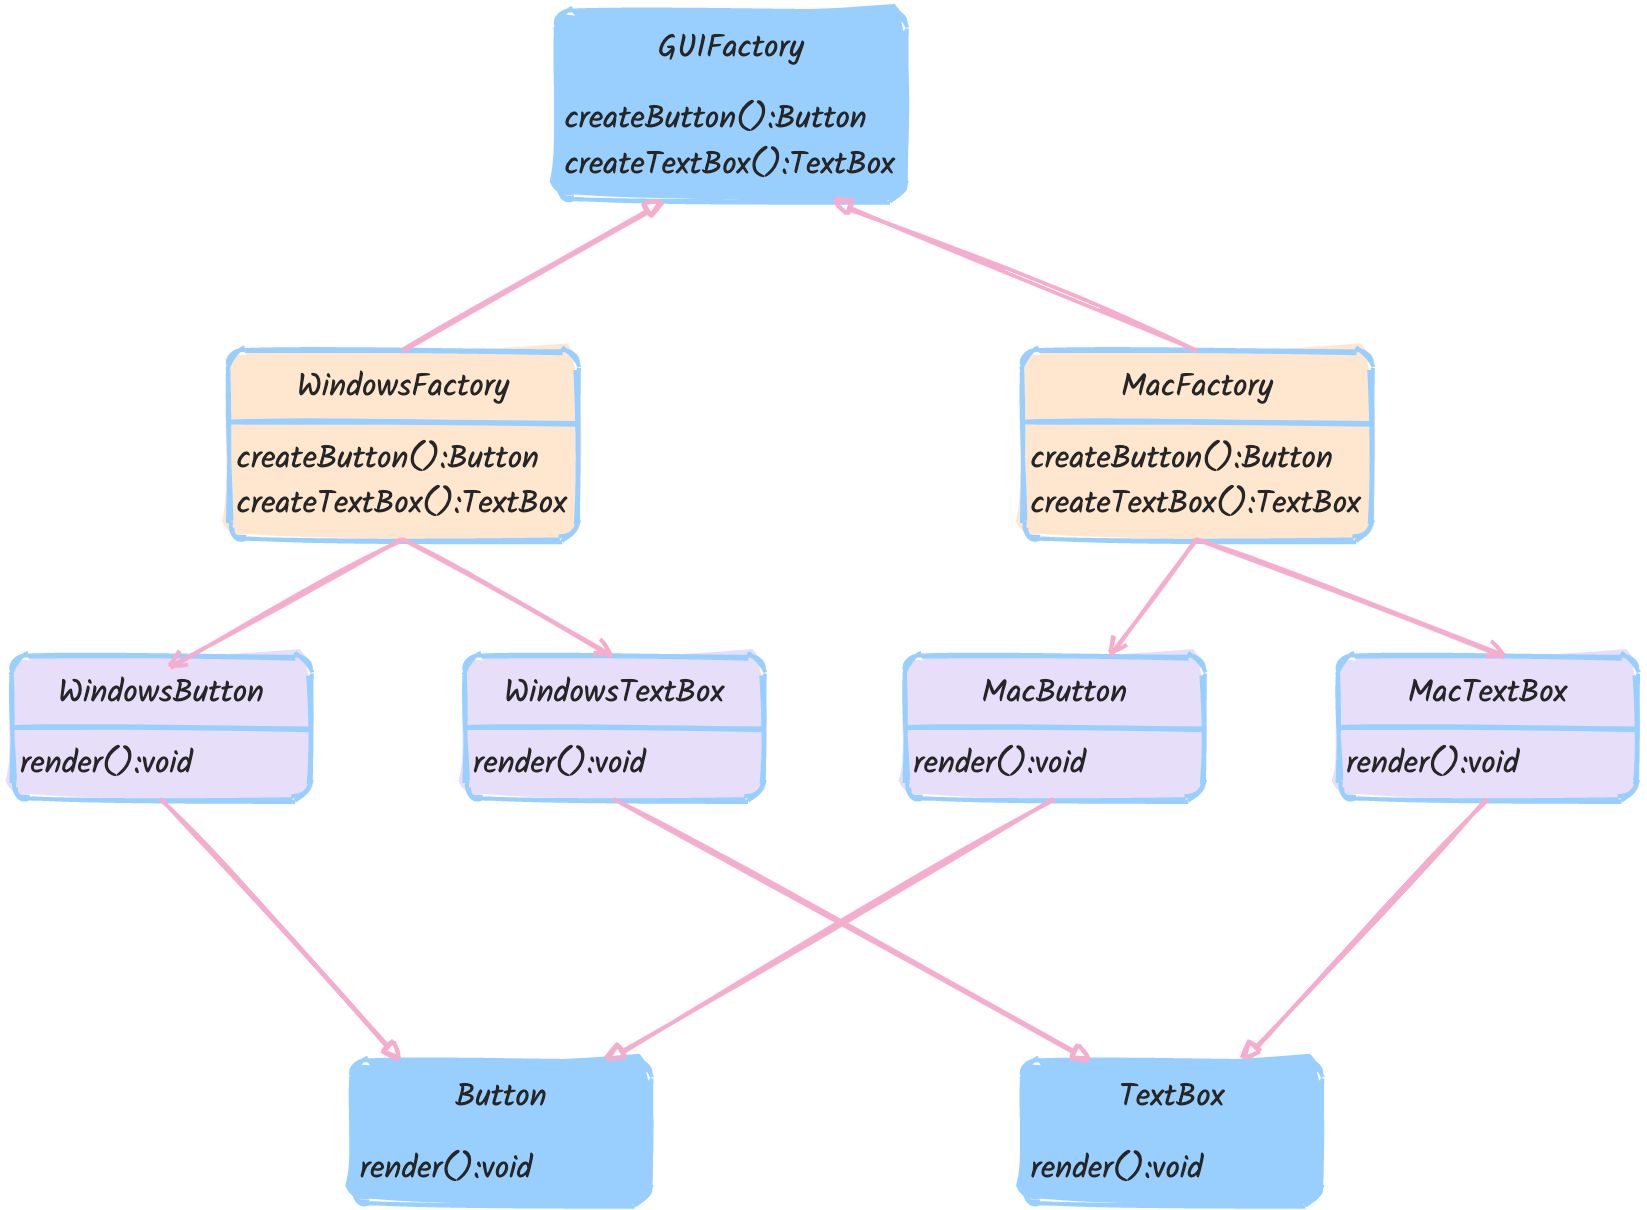
定义按钮和文本框的接口
interface Button {
  render(): void;
}

interface TextBox {
  render(): void;
}
实现具体的产品类
class WindowsButton implements Button {
  render(): void {
    console.log("Rendering Windows button");
  }
}

class WindowsTextBox implements TextBox {
  render(): void {
    console.log("Rendering Windows textbox");
  }
}

class MacButton implements Button {
  render(): void {
    console.log("Rendering Mac button");
  }
}

class MacTextBox implements TextBox {
  render(): void {
    console.log("Rendering Mac textbox");
  }
}
定义抽象工厂接口
interface GUIFactory {
  createButton(): Button;
  createTextBox(): TextBox;
}
实现具体的工厂类
class WindowsFactory implements GUIFactory {
  createButton(): Button {
    return new WindowsButton();
  }

  createTextBox(): TextBox {
    return new WindowsTextBox();
  }
}

class MacFactory implements GUIFactory {
  createButton(): Button {
    return new MacButton();
  }

  createTextBox(): TextBox {
    return new MacTextBox();
  }
}
使用抽象工厂创建 UI 元素
function renderUI(factory: GUIFactory) {
  const button = factory.createButton();
  const textBox = factory.createTextBox();
  button.render();
  textBox.render();
}

const windowsFactory = new WindowsFactory();
const macFactory = new MacFactory();

renderUI(windowsFactory);  // 输出: Rendering Windows button, Rendering Windows textbox
renderUI(macFactory);      // 输出: Rendering Mac button, Rendering Mac textbox
抽象工厂模式使得我们可以轻松地切换不同的产品系列,而无需修改现有代码。
抽象工厂模式的优缺点
优点
- 产品的一致性:抽象工厂模式确保生产一系列相关或依赖的对象具有一致性。
- 解耦客户端和具体产品:客户端代码通过抽象工厂接口与具体的产品类进行交互,不需要知道具体类的名称。
- 便于扩展:添加新的产品系列只需要增加新的具体工厂类,而无需修改现有系统。
缺点
- 增加系统复杂性:抽象工厂模式引入了更多的类和接口,使得系统变得更加复杂。
- 不灵活:很难增加新的产品,与工厂模式相比,抽象工厂模式对扩展新的产品种类不如工厂模式灵活。
应用场景
动态组件创建
在现代前端框架(如React、Vue)中,工厂模式可以帮助动态创建组件,根据需求返回特定类型的组件实例。
假设我们有不同类型的按钮组件:PrimaryButton、SecondaryButton 和 DangerButton。我们可以使用工厂模式动态创建这些按钮组件。
// 按钮接口
interface Button {
  render(): void
}

// 具体按钮类
class PrimaryButton implements Button {
  render(): void {
    console.log('Rendering PrimaryButton')
  }
}

class SecondaryButton implements Button {
  render(): void {
    console.log('Rendering SecondaryButton')
  }
}

class DangerButton implements Button {
  render(): void {
    console.log('Rendering DangerButton')
  }
}

// 按钮工厂类
class ButtonFactory {
  static createButton(type: string): Button {
    switch (type) {
      case 'primary':
        return new PrimaryButton()
      case 'secondary':
        return new SecondaryButton()
      case 'danger':
        return new DangerButton()
      default:
        throw new Error('Invalid button type')
    }
  }
}

// 使用工厂模式创建按钮
const primaryButton = ButtonFactory.createButton('primary')
primaryButton.render()

const secondaryButton = ButtonFactory.createButton('secondary')
secondaryButton.render()

const dangerButton = ButtonFactory.createButton('danger')
dangerButton.render()
服务实例化
在大型前端应用中,不同的服务可能有不同的实现,通过工厂模式可以统一管理服务的实例化,提高代码的可维护性。
比如,我们可能有需要不同的用户服务实现:LocalUserService 和 RemoteUserService。通过工厂模式可以统一管理服务的实例化。
// 用户服务接口
interface UserService {
  getUser(): void
}

class LocalUserService implements UserService {
  getUser(): void {
    console.log('Fetching user from local storage')
  }
}

class RemoteUserService implements UserService {
  getUser(): void {
    console.log('Fetching user from remote API')
  }
}

class UserServiceFactory {
  static createUserService(type: string): UserService {
    switch (type) {
      case 'local':
        return new LocalUserService()
      case 'remote':
        return new RemoteUserService()
      default:
        throw new Error('Invalid service type')
    }
  }
}

// 使用工厂模式创建用户服务
const localService = UserServiceFactory.createUserService('local')
localService.getUser()

const remoteService = UserServiceFactory.createUserService('remote')
remoteService.getUser()
请求处理
在处理不同类型的请求时,工厂模式可以根据请求类型创建相应的处理器,从而简化代码逻辑。
假设我们有不同的请求处理器:GetRequestHandler、PostRequestHandler 和 PutRequestHandler。通过工厂模式可以简化请求处理逻辑。
// 请求处理器接口
interface RequestHandler {
  handleRequest(): void
}

// 具体请求处理器类
class GetRequestHandler implements RequestHandler {
  handleRequest(): void {
    console.log('Handling GET request')
  }
}

class PostRequestHandler implements RequestHandler {
  handleRequest(): void {
    console.log('Handling POST request')
  }
}

class PutRequestHandler implements RequestHandler {
  handleRequest(): void {
    console.log('Handling PUT request')
  }
}

// 请求处理器工厂类
class RequestHandlerFactory {
  static createRequestHandler(method: string): RequestHandler {
    switch (method) {
      case 'GET':
        return new GetRequestHandler()
      case 'POST':
        return new PostRequestHandler()
      case 'PUT':
        return new PutRequestHandler()
      default:
        throw new Error('Invalid request method')
    }
  }
}

// 使用工厂模式创建请求处理器
const getRequestHandler = RequestHandlerFactory.createRequestHandler('GET')
getRequestHandler.handleRequest()

const postRequestHandler = RequestHandlerFactory.createRequestHandler('POST')
postRequestHandler.handleRequest()

const putRequestHandler = RequestHandlerFactory.createRequestHandler('PUT')
putRequestHandler.handleRequest()
UI主题切换
创建不同的UI组件集合,如按钮、输入框、文本等,主题可以是Light主题和Dark主题。 假设我们需要在应用中支持Light主题和Dark主题,我们将创建不同的UI组件集合,如按钮和文本框。通过抽象工厂模式,我们可以轻松地切换主题而不需要修改大量代码。
// 抽象产品:按钮
interface Button {
  render(): void;
}

// 抽象产品:文本框
interface TextBox {
  render(): void;
}

// Light主题的具体按钮产品
class LightButton implements Button {
  render(): void {
    console.log("Rendering Light Button");
  }
}

// Dark主题的具体按钮产品
class DarkButton implements Button {
  render(): void {
    console.log("Rendering Dark Button");
  }
}

// Light主题的具体文本框产品
class LightTextBox implements TextBox {
  render(): void {
    console.log("Rendering Light TextBox");
  }
}

// Dark主题的具体文本框产品
class DarkTextBox implements TextBox {
  render(): void {
    console.log("Rendering Dark TextBox");
  }

  // 抽象工厂接口:UI工厂
  interface UIFactory {
  createButton(): Button;
  createTextBox(): TextBox;
}

// Light主题工厂
class LightUIFactory implements UIFactory {
  createButton(): Button {
    return new LightButton();
  }
  createTextBox(): TextBox {
    return new LightTextBox();
  }
}

// Dark主题工厂
class DarkUIFactory implements UIFactory {
  createButton(): Button {
    return new DarkButton();
  }
  createTextBox(): TextBox {
    return new DarkTextBox();
  }
}

// 客户端代码,根据需要的主题类型创建工厂
function createUI(factory: UIFactory) {
  const button: Button = factory.createButton();
  const textBox: TextBox = factory.createTextBox();

  button.render();
  textBox.render();
}

// 使用Light主题工厂创建UI组件
const lightFactory: UIFactory = new LightUIFactory();
createUI(lightFactory);

// 使用Dark主题工厂创建UI组件
const darkFactory: UIFactory = new DarkUIFactory();
createUI(darkFactory);

// 输出:
// Rendering Light Button
// Rendering Light TextBox
// Rendering Dark Button
// Rendering Dark TextBox
多类型API请求
在处理不同类型的API请求时(如REST和GraphQL),可以使用抽象工厂模式创建相应的请求和响应处理机制。
// 抽象产品接口
interface APIRequest {
  callAPI(): void
}

interface APIResponse {
  parseResponse(): void
}

// 具体产品类(REST)
class RESTRequest implements APIRequest {
  callAPI(): void {
    console.log('Calling REST API')
  }
}

class RESTResponse implements APIResponse {
  parseResponse(): void {
    console.log('Parsing REST Response')
  }
}

// 具体产品类(GraphQL)
class GraphQLRequest implements APIRequest {
  callAPI(): void {
    console.log('Calling GraphQL API')
  }
}

class GraphQLResponse implements APIResponse {
  parseResponse(): void {
    console.log('Parsing GraphQL Response')
  }
}

// 抽象工厂接口
interface APIFactory {
  createRequest(): APIRequest
  createResponse(): APIResponse
}

// 具体工厂类(REST)
class RESTFactory implements APIFactory {
  createRequest(): APIRequest {
    return new RESTRequest()
  }

  createResponse(): APIResponse {
    return new RESTResponse()
  }
}

// 具体工厂类(GraphQL)
class GraphQLFactory implements APIFactory {
  createRequest(): APIRequest {
    return new GraphQLRequest()
  }

  createResponse(): APIResponse {
    return new GraphQLResponse()
  }
}

// 客户端代码
function handleAPI(factory: APIFactory) {
  const request: APIRequest = factory.createRequest()
  const response: APIResponse = factory.createResponse()

  request.callAPI()
  response.parseResponse()
}

// 使用REST工厂处理API请求
const restFactory: APIFactory = new RESTFactory()
handleAPI(restFactory)

// 使用GraphQL工厂处理API请求
const graphQLFactory: APIFactory = new GraphQLFactory()
handleAPI(graphQLFactory)

// 输出
// Calling REST API
// Parsing REST Response
// Calling GraphQL API
// Parsing GraphQL Response
总结
工厂模式的优势总结如下:
- 封装创建逻辑:工厂模式将对象创建的逻辑封装在一起,提供一个统一的创建接口,简化了代码。
- 提高代码灵活性:通过工厂模式,可以轻松地更改对象的创建过程,甚至替换不同的实现,而无需修改使用这些对象的代码。
- 促进依赖注入:工厂模式和抽象工厂模式支持依赖注入(DI),这在大型应用中尤为重要,有助于模块之间解耦
- 方便扩展:工厂模式支持更容易地扩展代码,通过新增具体工厂或产品类可以方便地扩展系统功能。
工厂模式和抽象工厂模式在前端开发中有广泛的应用,它们为对象创建过程提供了灵活、高效的解决方案。通过使用这些模式,可以提高代码的可维护性和可扩展性,应对复杂的前端开发需求。
Keep Reading